Category Archives: Data Center Hardware

Stress Testing an ESXi Host – CPU and MCE Debugging

I have needed to stress test a component inside a physical server – this time it was CPU and I’d like to share my method here. I have done a Memory Stress Test using a Windows VM in a previous article. I will be using a Windows VM again, but this time it will be Windows  Server 2012 Standard Edition that can handle up to 4TB Memory and up to 64 Sockets containing 640 logical processors – a very nice bump from Windows Server 2008 R2 Standard that had a Compute configuration maximum of 4 sockets and 32 GB RAM.

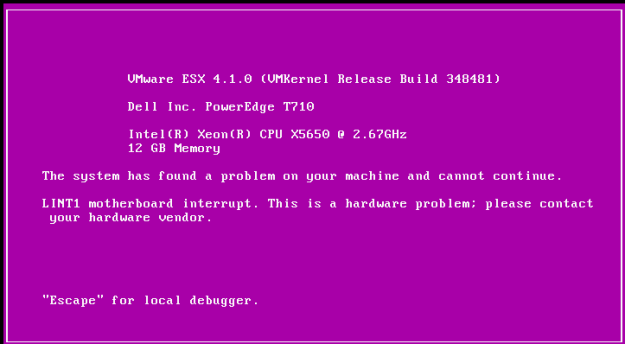
The host has crashed several times into a PSOD with Uncorrectable Machine Check Errors. From the start I had a hunch that the second Physical CPU or a System Board are faulty – but these were replaced already and the host has crashed yet again. I have taken a closer look at the matter and went to stress thest this ill host’s CPUs. Continue reading

nVidia GRID K2 vDGA with VMware Horizon View using PCoIP

Today I’d like to share a very interesting lab session with you all – the result will be a dedicated virtual machine with one of nVidia GRID K2’s GPU Cores enabled and accessed via Horizon View’s PCoIP protocol, where we’ll take a small look at its performance and parameters.

Prerequisites

You will not need much for this very basic VMware Horizon environment – a VM where either vDGA or vSGA is present and Horizon View Agent & Horizon View Agent Direct-Connection Plugin installed to allow you to connect to it via PCoIP.  You will be connecting to this VM via the VMware Horizon Client. Continue reading

Running 3DMark 2000 In a vSGA-Enabled Virtual Machine

Since I have made the vSGA feature to work in a Virtual Machine, I wanted to see how powerful will this rendering technology be. Sure, there is software that is dedicated to workstation performance benchmarks, but my mind has come around one application that was widely used to compare rigs (and it still is, although in a much newer version – FutureMark 3DMark 2013) It was MadOnion’s (love that company’s name) 3DMark 2000 and I remember running it countless times after swapping my 4MB Graphics Adapter for a 16MB nVIDIA TNT2 Ultra just to see the new, fluid FPS.

This post is a little nostalgy, sure, but seeing this benchmark run in a virtual environment, actually using a fraction of a GPU that is vastly superior to the PCI and AGP-powered adapters that  were available back then has evoked a smile on my face, and memories – oh the memories.

Anyways, without further ado I’d like to share the 3Dmark results with you – it is 1024×768 at 32bpp – nothing too fancy for today’s standards (and the most I could have squeezed off the settings). I didn’t expect an outright blast from the vSGA technology, mainly because the GPU  is being partitioned and also because of the fact that the maximum you can get is DirectX 9 and OpenGL 2.1.

3dmark2000-1

Wow, almost 30k 3DMarks, good job!

Although this may be viewed by many as a redundant thing to do – it’s these little things that brighten my profession occasionally 🙂 I’ll be digging around vSGA and vDGA in the coming weeks, so this is just a little taste of things to come.

Enabling vSGA on an nVidia GRID Powered ESXi Server

We have a new lab environment and were so lucky to have an nVidia GRID K2 included in one server for testing out its rendering capabilities under virtualized environment. When I had some time to play around I made a first step towards drawing the GRID’s power and deployed a VM that will be using a shared 3D acceleration method, also known as vSGA. Continue reading

PSOD caused by LINT1 Motherboard Interrupt

One night we had a situation on our remote site that was running ESX 4.1.0 on a DELL PowerEdge T710 Server. It went to PSOD and then the RAID controller stated that it was unable  to boot. The screen captures we got were:

purple%20screen

And after a reboot, an unwelcoming screen was shown:

Fortunately, after another reboot the system booted just fine, however it was pretty obvious that the hardware itself was in a pretty unstable state. On iDRAC, we have discovered that we got a critical warning on a component (unfortunately it was late at night and I didn’t think about screenshotting that) with Bus IDs 03:0:0. Listing components via lspci revealed that the following component was sitting on the given ID:

03:00.0 RAID bus controller: LSI Logic / Symbios Logic MegaRAID SAS GEN2 Controller (rev 05)

 Even if it was straightforward from the get-go which component might have been failing, it was double-confirmed by the very useful lspci command.

ESXi Boot Loop on Dell PowerEdge R720

We have faced quite a strange issue with one of our Dell PowerEdge servers on a remote site. When the branded image was deployed on the host, we kept getting bootloops. The system has just started unloading modules after they were seemingly loaded. After inspecting the vmkernel log at boot-time by pressing ALT-F11, I have noticed a few strange warnings:

2014-11-24T04:13:50.237Z cpu2:2631)WARNING: ScsiScan: 1485: Failed to add path vmhba1:C0:T0:L0 : Not found
2014-11-24T04:15:08.990Z cpu7:2792)WARNING: ScsiScan: 1485: Failed to add path vmhba1:C0:T0:L0 : Not found

I have poked around the settings in BIOS to find out what could have been causing the issue that were seemingly coming from the RAID controller itself. I have changed the SATA to report as RAID opposed to AHCI which was set previously, and the next boot was successful.

This didn’t have any effect on already present drives or data because the only device that used the on-board storage controller was the DVD-ROM.

HyperThreading: What is it and does it benefit ESXi?

Many times I come across the question of HyperThreading and its benefits – either in personal computing, but more importantly over the last few years, virtualization. I’d like to talk about what HyperThreading is for a moment, and show you if it benefits the virtualized environment.

What is HyperThreading?

Today, you see HyperThreadng (HT) technology is present on almost every Intel processor, be it Xeon or Core i3/i5/i7 Series. Basically, it splits one physical core to two logical cores, but the term splitting is somewhat inaccurate and confuses many consumers. Thinking that when they run a 2.5GHz 4-core, HyperThreaded CPU, they immediately have 8 effective cores carrying the full processing capability of 20 GHz. Mainly because when you say you split something, you think that this has been divided to two equal parts (or at least that’s what I think, anyways). Continue reading

1GbE Intel NIC Throttled to 100Mbit By SmartSpeed

We had a case on one of our ESXi hosts equipped with an Intel Corporation 82571EB Gigabit Ethernet Controller – although it was 1Gbit in speed, we were unable to achieve autonegotiation higher than 100 Mbit. When setting it manually to 1Gbit, the NIC disconnected itself from the network. Every other setting worked – 10 Mbit and 100Mbit both half and full duplex. We tried investigating with our Network Team, forcing 1Gbit on switch and that has also brought the NIC down.

I delved deeper into this issue and observed the VMkernel log via tail -f when I have forcibly disconnected the NIC and reconnected it again via esxcli. One line appeared that caught my attention:

vmnic6 NIC Link is Up 100 Mbps Full Duplex, Flow Control: None
e1000e 0000:07:00.0: vmnic6: Link Speed was downgraded by SmartSpeed
e1000e 0000:07:00.0: vmnic6: 10/100 speed: disabling TSO

I immediately caugt up on SmartSpeed and tried to find a way to disable it – that is until I have found out on many discussion threads later that SmartSpeed is an intelligent throtlling mechanism that is supposed to keep the connection running on various link speeds when an error somewhere on the link path is detected. The switches were working okay, the NIC didn’t detect any errors, so the next thing to be checked would be the cabling.

I arranged a cable check with the Data Center operators and what do you know – replacing cables for brand new ones eventually solved the issue! Sometimes the failing component causing you a headache for a good few hours can be a “mundane” piece of equipment such as patch cables.

How much memory should be free for VMkernel?

Recently I have made a small research to see how much free RAM does VMkernel need to work without any hiccups due to:

  • Memory Reclamation Techniques
  • Memory Reservation for the VMkernel itself

I have gathered this data from live environment. However one very important metric is not included in the below measures and graphs, and that is the Virtual Machine overhead that is individual for each environment and is dependant on the VMs’ Memory and vCPU amount.

A quick explanation:

  • RAM [GB]: How many Gigabytes of RAM are installed in the Server.
  • VMKernel [MB]: How many MB are reserved for the VMkernel itself (you can find this value in Configuration -> System Resources Tab).
  • Reclamation [MB]: Calculated with a Memory Reclamation Formula (900 MB + 1% of memory above 24GB).
  • Total [MB]: Sum of VMKernel & Reclamation values. This should be the governing baseline value.
  • Free [%]: How much % of the total server’s memory should be free.
RAM [GB] VMKernel [MB] Reclamation [MB] Total [MB] Free [%]
8 1393 900.0 2293.0 28.0
16 1749 900.0 2649.0 16.2
24 2378 900.0 3278.0 13.3
48 2682 1145.8 3827.8 7.8
64 2745 1309.6 4054.6 6.2
96 3514.5 1637.3 5151.8 5.2
128 3612 1965.0 5577.0 4.3
192 5218.5 2620.3 7838.8 4.0
384 8220 4586.4 12806.4 3.3
512 9985 5897.1 15882.1 3.0

And a graph is below:

Memory Reservation Graph

A Graph representing the GB Installed vs. MB reserved memory.

I hope this table comes in useful when deciding how much RAM there is in your environment for the hosts to use.

Online ESXi Firmware and Driver Upgrade on HP Servers

When upgrading firmware and drivers on a huge amount of servers, it used to be time-consuming to perform a firmware upgrade after a reboot on each and every one of your ESXi hosts to match the standard. Not anymore – since Service Pack for ProLiant 2014.09.0, the NIC Firmware can be upgraded online as well since its 10.x version (a bump from the 3.x or 4.x versions that now share a unified firmware). A huge step forward – now all the applicable firmware can be upgraded in one go – and online! No need to wait to catch the boot menu and go through HP Smart Update Manager individually.

Here’s a step by step walkthrough:

  1. Download the HP Service Pack for ProLiant you wish to apply. You will need to have a HP account and a server under warranty linked to it in order to download the newest releases.
  2. Stage the .iso file to a server that has a good connection to all the ESXi hosts you plan to upgrade (preferrably a terminal server inside the Data Center) and unpack it to the location of your liking.
  3. Run \\spplocation\hp\swpackages\x64\hpsum_bin_x64.exe – the binary will depend on your OS flavor.
  4. The following console window will pop up, stating that the HP SUM Web Service has been launched and a default web browser will lanch on the machine, opening the address localhost:63001 and automatically logging you in by passing through your credentials. You can also connect to your terminal server from any other computer that can access its ports 63001 or 63002 (and it is more comfortable that way). I strongly suggest using Google Chrome.
    image001
  5. If you access the web interface, this is what you get.image003
  6.  Start by clicking on the drop-down arrow in the top left corner and select Baseline Libraryimage005
  7. You will need to manually initiate the inventory process for the selected baseline, so click on the already present one for the process to begin.
    image007
    After a few minutes, the inventory completes.
    image009
  8. Now we need to add our ESXi hosts, select VM hosts from the drop-down menu.image011
  9. Localhost is added automatically and unfortunately can’t be changed. Click on Add Node.image013
  10. You can either add a single node by its FQDN or a range of IP addresses separated by a dash. You need to specify the type of device you are adding and the package that is your baseline. Don’t forget to put in the root credentials else the initialization will fail.image015
  11. If you need to select specific nodes inside a range, the second entry in the “Select the type of add” has just what you need. You enter the range, and after a scan you select the nodes you desire. Shift+Click and CTRL+Click work here like a charm.image017
  12. After you have added the nodes via the “Node Range” method, select the baseline to apply to them and enter the root credentials. image019
  13. When you were successful and the hosts were added, you can select multiple hosts by shift+click or ctrl+click and the right frame will change to multiple selection operation.image021
  14. Here you will need to select the baseline again by clicking on Select Baselinesimage023
  15. Select the SPP and click on Add
    image025
  16. Back in the multi-select frame you enter root credentials in order to scan the hostsimage027
  17. You will see the inventarization progressimage029
  18. Once the SUM evaluates an update is needed, input the root credentials again and Deploy the components.image031image033
  19. You have reached the familiar deploy screen where you choose the components to upgrade. When you choose Deploy, it will initialize and you will see a gray wheel spinning beside the chosen hosts.image035

When the deployment is complete, you will have a green light next to your hosts you applied updates to, and the updates will be applied on the next reboot – which is ideal for combination with VMware Update Manager to apply patches & firmware in one take.