Monthly Archives: November 2014

PSOD Caused by a Machine Check Error (MCE)

Today I’d like to present to you an ESXi host crash we had in our environment tha was due to a hardware failure. This time, we were “lucky” enough to capture its PSOD. In earlier article about Machine Check Errors, I was talking about what exactly do they mean and how to debug them. Also, most of the time, when these are correctable Machine Check Errors, the host only reboots itself without leaving any trace as of why. That I have investigated by determining faulty memory after running a custom memory stress test on an ESXi host.

The Uncorrectable Machine Check Exception presented below is caused by “Other TransBus Generic Error” – this could have been related either to a CPU, or pathways on the motherboard… or both. Most of VMkernel dumps was pointing out to 2nd Physical CPU, but there were some occurrences on 1st CPU as well. Even the AHS log from the HP blade server was corrupted each time I tried to send it to a technician. Therefore they took action and replaced both the motherboard and CPUs. Since then there were no more trouble with this host.

PSOD due to Uncorrectable MCE on CPU

Manual Debugging:

For those of you who are interested – the MCE codes reported were:

In iLO: FA001E8000020E0F
in vmkernel.log: c800008000310e0f ; 8800004000310e0f

Now, if we decode the message we got from iLO manually (so that we have another source of MCE to decode from):

1 1 1 1 1 0 1 0 0 00 0000000011110100 0 0000 0000000000000010 0000 1110 0000 1111

UC 1
PCC 1
S 0
AR 0

Signaling:
Uncorrected error (UC). RESET THE SYSTEM

Examples? None found.

Compound error code found: Bus and Interconnect Errors.

BUS LL PP RRRR II T
BUS{11}_{11}_{0000}_{11}_{0}_ERR

Level: 11, generic
Request: 0000, Generic

Bus & Interconnect mnemonics:
Participation: 11, Generic

Therefore: Generic Bus and Interconnect Error

Here you see VMkernel is pretty good at decoding the MCEs by itself, but it can also be very useful to see for yourself what the real cause was if your error decode is missing.

My VCP Exam Experience

Hi there! Today I’d like to share my VCP Exam experience with you. I hope this will encourage the people who are preparing to do it at some point in time (be it tomorrow or in a few months) and to share some heart-felt moments with you that have also successfully passed this examination. So stay awhile, and listen 🙂

Preparations.

I got my free exam voucher from Karel Novak by winning a drawing at his vmware-veeam blog. This voucher was time-limited to the end of September, so I wanted to schedule it just for that time so I could soak up the most hands-on experience from my newly acquired position as a last level specialist. Since hands-on experience is the king, I have relied primarily on that resource in order to “prepare” myself.

Since I like to soak up as much information possible on tech stuff I get my hands on, I have purchased a Mastering VMware vSphere 5.5 on which I have written a review in one of my earlier posts (spoiler: it’s helped me a LOT to pass the exam!). Since trip to my job takes around an hour, I was reading it on the bus for about a month before I actually got my exam scheduled.

The Actual Exam.

I arrived at the Pearson-certified testing center and everything went full swing. I have signed a few papers regarding NDA on question reproduction and order in the exam room. Then I got my photo taken by a webcam (you have to sit still for about 10 seconds which was nearly impossible for me), provide an electronic signature and off I went for my exam.

The rumours you might have heard about the draconian exam room rules were all true – you aren’t allowed to drink, chew gum, make any loud noises and do anything else that would disturb other people in the room. You are under surveillance the whole time and the only things you are allowed to carry with you to the exam room is a pen, an erasable board (you also give it back with all your scribblings) and a pen you are given by the attendant. If you want to leave, you have to ring for the attendant to pick you up and provide her with your ID. It sounds horrid but trust me, it’s not bad at all when the exam timer starts ticking – then you’ll have the time to worry about.

My initial (and foolish) thoughts were: Pfff, I’ll be done in a few minutes, take my certificate and go home. No need for all 135 minutes I got for the exam. Oh, I couldn’t have been more wrong – I consumed every single second of that exam and let that timeout state my fate. Halfway through the exam I had an impending doom come down, telling myself “there is no way in hell I’m gonna make this”.

Some of the questions concerned technologies we don’t use in our environment, some (all right, most of them) had pretty tricky wording. I had to read them several times over to make sure the authors don’t catch me off guard this required a tremendous amount of concentration. Overall this exam tests your vSphere knowledge of vSphere thoroughly – configuration, storage, networking, resource management – such a happy concoction. Fortunately, some questions correlated to each other so if I contradicted myself on some of those, I stopped for a minute (and watch  the timer tick away) to re-think my approach to the question. Again, hands-on experience is invaluable in this exam.

In the end, I managed, and a huge boulder fell of my heart.

What’s next?

Passing this certification gave me such a huge boost that I decided to finally start a blog I’d just been rambling about for quite some time, become active in VMware Communities participation, and established another personal goal to try VCAP-DCD or DCA in the next year. It is a gret feeling of accomplishment that you stood the trial by fire, and I hope that all of you who will be undertaking this exam in the future will eventually feel the same way.

Host IPMI Event Status Alarm PowerCLI Fix

Sometimes we are affected by a (supposedly firmware) bug that rarely affects our ESXi hosts in vCenter. This happens mainly on HP BL460c blade servers. You will get an alarm with IPMI Event Log Status, Other Hardware Objects, or Hardware Temperature status, but everything will appear okay on the Hardware Status screen and the IPMI log will be clear (or show you that 65535 are present when they aren’t). The gathered information has  pinpointed me towards resetting the CIM Service and Hardware Monitoring agents.

What this handy PowerCLI Script does is basically everything described above, but without tne hassle of connecting to each host manually – it’s a bit modular so take a look on the code first if you understand the mnemonics, if not just run it, enter your vCenter and VM name (don’t forget to see the $hosts value – it should contain your domain’t name!) and wait for a moment.

Write-Host "Reset sensors, refresh HW data & their views on an ESXi host" `n -ForegroundColor Green

<# Uncomment this to enable connection to vCenters defined in a text file
# 

$vcenterlist = Get-Content .\vcenters.txt

ForEach ($vcenter in $vcenterlist) {
Define vCenter
Write-Host `n"Connecting to vCenter $vcenter"

# Connect to vCenter
Connect-VIServer $vcenter | Out-Null
}
#>

# Define a blank array for the hosts
$hosts = @()

# input checking loop to check if $vcenter is null or not.
if ($vcenterlist -eq $null) {
do  {

[Boolean]$match = $false
$vcenter = Read-Host "Define a vCenter where the host is located"
$vcenter.Replace(' ','')
if ($vcenter -notlike "") { $match = $true }

Else {
Write-Host "The value must not be null. Try again or CTRL+C to break."`n -ForegroundColor Red
$match = $false
}

} Until ($match -eq $true)
}

# ESXi host definition
$input = Read-Host "Enter a name of ESXi host where you want to reset the HW sensors"
# Generate FQDN and store into an Array
$hosts += "$input`.yourdomain.lab"

# Connect to vCenter
Write-Host `n "Connecting to vCenter $vcenter`..."
ForEach ($vcenter in $vcenterlist) {
Connect-VIServer $vcenter | Out-Null
}

# The VMhost needs to be stored into an array with Get-VMhost for further processing
$vmhosts = Get-VMHost -Name $hosts

# Get all vmhosts for the connected vCenter sessions
#$vmhosts = Get-VMHost

ForEach ($vmhost in $vmhosts)
{
	Try
	{
		#initialize calls for refreshing hardware status..
		Write-Host "Restarting CIM Server service on $vmhost"
		Get-VMHost $vmhost | Get-VMHostService | Where { $_.Key -eq “sfcbd-watchdog” } | Restart-VMHostService -Confirm:$false | Out-Null
		Start-Sleep -Seconds 15

		Write-Host "Starting to refresh HW info on $vmhost (this can take a while)"

		# Define variables for system calls
		$hv = Get-View $vmhost
		$hss = get-view $hv.ConfigManager.HealthStatusSystem

		Write-Host "Resetting HW Sensors..."
		$hss.ResetSystemHealthInfo()
		Start-Sleep -Seconds 15

		Write-Host "Refreshing Data..."
		$hss.RefreshHealthStatusSystem()
		Start-Sleep -Seconds 15

		Write-Host "Refreshing Data View..."
		$hss.UpdateViewData()
		Start-Sleep -Seconds 15
	}
	Catch [System.Exception]
	{
		Write-Host "There was an error while trying to refresh the hardware data." `n `
					"Please check the ESXi host's Hardware Status Tab." -ForegroundColor 'Red'
	}
	Finally
	{
		Write-Host "Disconnecting from the vCenter Server..."
		Disconnect-VIServer $vcenter -Confirm:$false
		Write-Host "Done processing $vmhost." -ForegroundColor Green
	}
}

I Hope it has alleviated at least one occurrence of this bug 🙂

What is Virtualization?

Since I’d also like to have this blog more accessible for people of different skillsets, I’d like to make a short introduction to the Virtualization technology that is very progressive the last few years.

Physical Servers

Servers are machines that, under ideal conditions, operate 24 hours a day, 7 days a week, 365 days in a year. For stability and compatibility purposes, they are often running only one application or service for the highest possible uptime. However we know that maintaining this level of service is an exceptional task that is very hard to reach. In the age where multi-core and multi-threaded processors are prominent, having a quad-core processor just sitting there as a file or a simple application server would be a waste of resources. Here’s a little list.

Server operation cost:

  • Electricity that the servers consume and energy used for cooling the server room.
  • Actual physical space where 1 server = 1 slot in a rack.
  • Time and money if anything decides to break down at any time, requiring a technician’s visit to replace a faulty motherboard or a memory module that either crashed the server completely or caused an avalanche of BSODs (or any other kernel panic colors).
  • Money for space rental (if you don’t have your own data center).

Furthermore:

  • In most cases, physical hardware  in loaded small percentages when running.
  • Storage may not be easily expanded.

This is remedied with one very effective solution:

Virtualization

This technology enables multiple virtual machines of various Operation Systems to run on one physical server under a so-called hypervisor. Depending on server’s hardware capabilities and application needs, one physical server can run a few resource-demanding , or many lightweight machines.

The hypervisor is a “barebone OS” (in case of VMware, a POSIX-like system with unix-like commandline thanks to the BusyBox Libraries) installed on a bare metal. Once installed, properly configured and managed, it handles all virtual machines’ requests for CPU, memory and IO operations intelligently and scheduling resources when and where needed. Literally it transforms all BIOS instructions the virtual machines generate into the BIOS of physical hardware. Think of it as a robot who catches multiple requests from various sources and has only one output path where he sorts them.

A Virtual machine is a set of files, stored in a folder on a data store using a special file system called VMFS (Virtual Machine File System). These files contain the VM configuration, BIOS’ NVRAM, local Virtual Machine Disks, Virtual Machine Swap Files, snapshot deltas and more.

Virtualization benefits:

  • One physical hardware runs multiple virtual machines – hardware is being used to its maximum potential if scaled well.
  • Hypervisor (or an ESXi host) can be run from local storage, USB drive, SD card, or directly from the memory (with Enterprise version of VMware).
  • VMs can communicate between themselves and have physical network NICs assigned with use of virtual network switches.
  • VMs on shared storage (FCoE / iSCSI / NFS) with clustered ESXi hosts can use High Availability or Fault Tolerance (VM Mirroring) in case of failures.
  • VMs can be dynamically configured how much memory and/or CPU resources they will use.
  • Devices attached to the computer you are running a management console from (VMware vSphere) can be attached to the VMs.
  • VMs can be transferred from one host to another without any issue involving a hardware change in the OS.

And the eventual outcome? Virtualization helps save resources: power, space, and time – mostly downtime that would be connected to a failure of one physical host where an application would be rendered unusable.

Upgrading BIOS on DELL PowerEdge Servers via UEFI

Once upon a time it is needed to upgrade either BIOS or Hard Driver firmware. Since DELL iDRAC 7 does not support writing to .img files anymore since the fw version 1.57.57, there had to be a new way of upgrading the firmware. And the way to do it is via UEFI.

To upgrade BIOS, browse to DELL’s support website for your given server and download the .efi file this way: Select Not Applicable Operating System and expand on the BIOS selection. There, download the .efi file – save in 8.3 format because the UEFI utility can not read longer filenames (as you will see further).

Get the .efi file when you unroll Other File Formats.

Get the .efi file when you unroll Other File Formats.

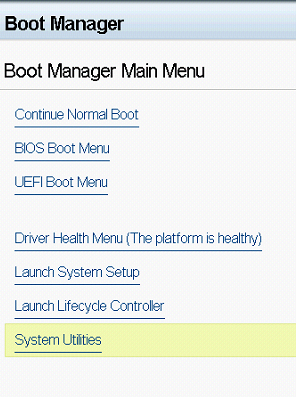
Use any tool which lets you create ISOs and put this .efi file in the .iso. Mount it in a remote console session, enter Boot Manager and follow the screenshots:

Select System Utilities from the Boot Manager Main Menu

Select System Utilities from the Boot Manager Main Menu

Choose BIOS Update File Explorer

Choose BIOS Update File Explorer

Select your mounted .iso file

Select your mounted .iso file

There select the .efi file - beware the 8.3 format if you have more files present on the ISO

There select the .efi file – beware the 8.3 format if you have more files present on the ISO

A blank prompt will appear - be patient.

A blank prompt will appear – be patient.

The .efi image will be loaded and you will be asked for confirmation.

The .efi image will be loaded and you will be asked for confirmation.

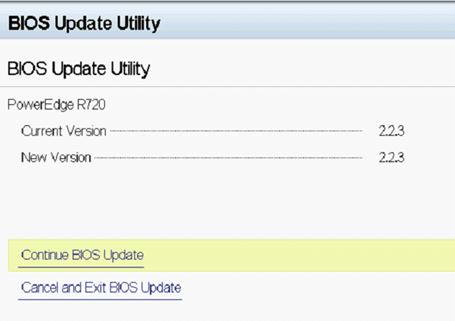
You will see the following screen during the update (disregard the matching versions)

You will see the following screen during the update (disregard the matching versions)

Your update was successful :)

Your update was successful 🙂

Now you are all done. Enjoy your upgraded BIOS 🙂

DELL Perc H710P Local Storage SSD RAID1 Benchmark

Recently we have equipped one of our ESXi hosts with local SSD storage (Product Number: LB806M) to host a database VM. For redundancy we have chosen RAID1. I have done a small benchmark to compare it to already present 4x 1,2TB 10k RPM (PN: ST1200MM0007) RAID10 array.

The RAID Controller serving the drives was DELL Perc H710P Mini (Dual processor, 1GB DDR3 NV Cache). I have used the IOmeter application with Access Specification File from my favorite tech-news aggregate site, TechPowerUp. I have run the test on a 1GB Chunk of data. Without further ado, here are the results (click on an image to enlarge):

Throughput Benchmark

Throughput Benchmark

IOPs Benchmark

IOPs Benchmark

Latency Benchmark

Latency Benchmark

Also, I’ve captured a few interesting screenshots from esxtop over the course of benchmarks. Notice that the controller doesn’t even break a sweat under that many IOPS:

Installing the Windows VM for benchmarking

Installing the Windows VM for benchmarking

Database Benchmark on the Mechanical Hard DRive and SSD running simultaneously.

Database Benchmark on the Mechanical Hard DRive and SSD running simultaneously.

Nice IOPS :)

Nice IOPS 🙂

Sequential Read Benchmark - the Controller Cache comes into play.

Sequential Read Benchmark – the Controller Cache comes into play.

Hope you enjoyed the numbers. See you around.

Create a Virtual Floppy with OSFmount utility

In the life of an IT administrator, you sometimes (or quite frequently) need to use the means of .iso files or .img virtual floppies to do your part of the job. There are many tools available on the web, but one that I really like is OSFmount, and I will show you why.

OSFmount is a handly little utility that lets you mount (even as a ramdisk) and modify the contents of virtual floppy images. Unfortunately .iso can be mounted only as a read-only media. I’ll show you how to make an empty floppy from scratch – you can follow the same steps to make an .iso

When you launch the application for the first time, an initial window shows up. Click on Mount New…

mountnew

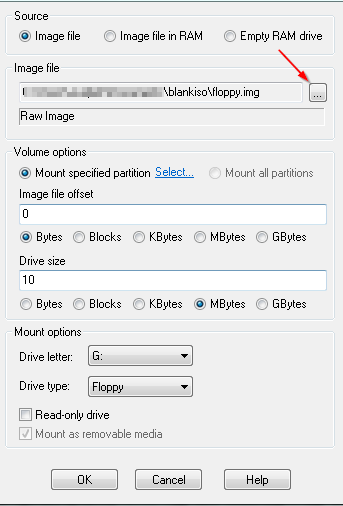
You will see the following form pop up. Fill in the values as you require – keep the offset at 0 as we are creating a brand new image, and choose the drive size you’d like. Since we are creating a floppy, choose the mountpoint so – but you can mount it as hard drive or CD/DVD. Assume that the Image File location is blank at the moment and click the three dots to define the image’s location.

mountnewdrive

Enter the name of your desired image file – doesn’t matter if the object already exists or not, just hit Open and Windows will ask you if you want to create the file.

createfile

Now, the newly created image isn’t formatted, so right-click the newly mounted .img and do that.

defaultformat

And there you go! You just created a 10MB virtual floppy .img file for yourself, which you can use on remote management consoles where you need an attachable media you can R/W to. Don’t forget to unmount before you start using it. Pretty simple, right?

Scripting Corner: NetApp Storage Controller Option Setter

Last week I have introduced to you NetApp Storage Controller Options Retriever – now it is the time to show you how to push a bulk amount of options to the NetApp Storage Controller via PowerShell. As with the previous post, you will need the Data OnTap PowerShell Toolkit.

The input of this script is a .csv file containing Option and Value columns – these must match exactly the options you wish to set and a valid value going along with it. The next imput is controllers.txt where your controllers you want to apply options to are written, with line break as a separator. A sample .csv is shown below:

Option;Value
cf.takeover.on_failure;on
cf.takeover.on_network_interface_failure;off
cf.giveback.auto.delay.seconds;600

And below is the script itself:

# The Module DataOntap is needed for this script to function.

# Define a function to push the given option
function Push-NaOption ($option, $value)
{
	Try
	{
		Set-NaOption -OptionName $option -OptionValue $value | Out-Null
	}
	Catch
	{
	Write-Host There was an error setting the $option on $sc. -ForegroundColor 'red'
	}
}

Write-Host `n "--- NetApp Option Pusher ---" -ForegroundColor 'Cyan' `n
$startedtime = Get-Date

# Generate a new array for controller list and fill it
$sclist = @()
$sclist += Get-Content controllers.txt

# Do the same with the options array
$CSV = Import-Csv optionstopush.csv

Write-Host 'Started pushing options to' $sclist.count 'Storage Controllers' `n

# Initialize failed controllers array
$failedcount = 0
$failednames = @()

# Start pushing the options
ForEach ($sc in $sclist)
{
	# Verify if the connection has been successful, if not increase the failed counter and add the name to array.
	Try
	{
		Connect-NaController $sc -ErrorAction 'SilentlyContinue' | Out-Null
		Write-Host "Processing Controller $sc" -ForegroundColor Green
		if ($global:CurrentNaController -eq $null)
		{
			Write-Host "Could not connect to Controller $sc ! Skipping..." -ForegroundColor Red
			$failedcount++
			$failednames += $sc
			Continue
		}

	}
	# Also catch an exception if it was thrown.
	Catch
	{
		Write-Host "Could not connect to Controller $sc ! Skipping..." -ForegroundColor Red
		$failedcount++
		$failednames += $sc
		Continue
	}

	ForEach ($line in $CSV)
	{
		Push-NaOption $line.Option $line.Value
	}

}

# Count statistics...
$endedtime = Get-Date
$timetook = ($endedtime - $startedtime).TotalSeconds

$scOK = $sclist.count - $failedcount

# Final stat listing.
Write-Host `n Processed $scOK Storage Controllers 'in' $timetook seconds. -ForegroundColor Green
If ($failedcount -ge 1)
{
	Write-Host `n "Connection to the following $failedcount controllers failed: " $failednames `n -ForegroundColor 'Red'
}

Hope this saved you some headache trying to push any amount of options to a large number of NetApp Storage Controllers.

Scripting Corner: NetApp Storage Controller Options Retriever

Once upon a time we had to make a revision of some options on about 50 NetApp Storage Controllers in our environment. The options were many and we needed to retrieve them in a reviewable fashion to mark out which comply to NetApp’s best practices.

You will require NetApp’s Data OnTap Powershell Toolkit in order for this script to run, because it uses their commandlets.

It took me four days to devise this script, mainly because I had other things to do like resolving incidents and doing actual work 😀 The hardest part was the looping and writing to CSV. This script has a few caveats:

  • If you search for just one option, the CSV will not be generated properly, so enter a random second option, input the same one or just an asterisk will do (the fields will be blank).
  • It is better if you take the CSV and invert it – better readability and searchability, however I have realized that after the script has been finished. And I’d rather not return to the cycling nightmare again 🙂
  • The CSV is generated procedurally inside a variable and is output to a file at the end of the script – if you stop it while running halfway, you get no partial CSV.

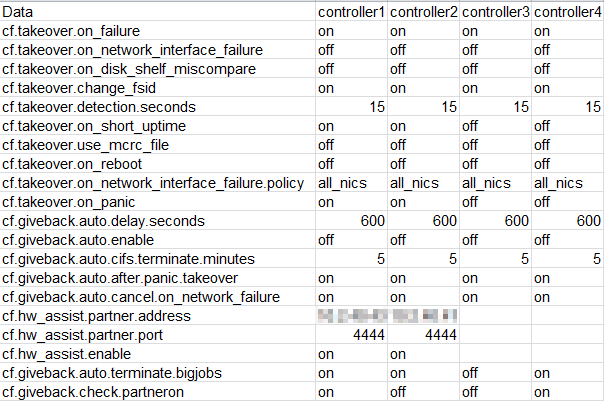
The sample output can  be found below:

A sample output from options collected by the script - not transposed.

A sample output from options collected by the script – not transposed.

You will need two input files – controllers.txt with the controllers you want to query and options.txt with options you wish to retrieve – the separator is a line break. Please note that the options must be input exactly as they appear in Data OnTap, else the script can misbehave. I hope many of you will find this script useful.

Import-Module DataONTAP

Write-Host `n "--- NetApp Option Retriever ---" -ForegroundColor 'Cyan' `n
$startedtime = Get-Date

#Define path to the exported CSV.
$csvpath1 = ".\options.csv"

# Generate a new array for controller list and fill it
$sclist = @()
$sclist += Get-Content controllers.txt

# Do the same with the options array
$optIN = @()
$optIN += Get-Content options.txt

Write-Host 'Started gathering' $OptIN.count 'options on' $sclist.count 'Storage Controllers' `n

# A base for list of options we want to find
$optcmd = "Get-NaOption | Sort | Select Name, Value"

# Create an array from the options we want to find by first sorting it out...
$optIN = $optIN | Sort

# ...And then formatting it like a CSV
$datasuffix = @("Data;")

# Fill in the first column of the CSV
foreach ($item in $optIN)
{
	$datasuffix += "$item" + ";"
}

# Intialize the array with first column
$CachedCsv = @()
$CachedCsv += $datasuffix

# Initialize empty array for the ignored fields
$ignored = @()

# Initialize failed filers value
$failedcount = 0
$failednames = @()

# Procedure to write all the CSV values using procedural CSV construction
ForEach ($sc in $sclist)
{
	Try
	{
		Connect-NaController $sc -ErrorAction 'SilentlyContinue' | Out-Null
		Write-Host "Processing Controller $sc" -ForegroundColor Green
		if ($global:CurrentNaController -eq $null)
		{
			Write-Host "Could not connect to Controller $sc ! Skipping..." -ForegroundColor Red
			$failedcount++
			$failednames += $sc
			Continue
		}

	}
	Catch
	{
		Write-Host "Could not connect to Controller $sc ! Skipping..." -ForegroundColor Red
		$failedcount++
		$failednames += $sc
		Continue
	}

	#Generate another column header = storage controller name
	$CachedCsv[0] += $sc + ";"

	# run the stored command
	$getvalues = Invoke-Expression $optcmd

	# Clear the IGNORED array
	$ignored.clear()

	# For each value got...
	for ($i = 0; $i -lt $getvalues.count; $i++)
	{
		# Search this value's name in the input options array
		for ($j = 0; $j -lt $optIN.count; $j++)
		{
			# And if it matches exactly, write it there
			if ($getvalues[$i].name -contains $optIN[$j])
			{
				$presentIndex = [array]::IndexOf($optIn, $optIN[$j])
				$CachedCSV[$presentindex + 1] += $getvalues[$i].value + ";"
			}
			# If the value we are looking for does not exist, write an empty field and enter that value in the $ignored array
			# So it does not get checked over and over again.
			ElseIf (($getvalues.name -notcontains $optIN[$j]) -and ($ignored -notcontains $optIN[$j]))
			{
				$ignored += $optIN[$j]
				$missingIndex = [array]::IndexOf($optIn, $optIN[$j])
				$CachedCSV[$missingindex+1] += ";"
			}
		}
	}
}

# Write out the cached CSV
"Sep=;" | Out-File $csvpath1
$CachedCsv | Out-File $csvpath1 -Append

# Count statistics...
$endedtime = Get-Date
$timetook = ($endedtime - $startedtime).TotalSeconds

$scOK = $sclist.count - $failedcount

# Final stat listing.
Write-Host `n Processed $OptIN.count options on $scOK Storage Controllers 'in' $timetook seconds. -ForegroundColor Green
If ($failedcount -ge 1)
{
	Write-Host `n "Connection to the following $failedcount controllers failed: " $failednames `n -ForegroundColor 'Red'
}

And of course, since there is an option Retriever for NetApp, there must also be an option setter, right? Yes you are correct and that will be a subject of a future Scripting Corner 🙂 See you soon!

Scripting Corner: Send Commands as a root via SSH to ESXi with permit root login disabled.

Once upon a time when I wanted to remove many datastores from many hosts in the process of their decomission after consolidation, I was struck by an issue that can be found at VMware’s KB Article 2011220. The file used by SIOC was locked and because of that the datastore couldn’t be removed. To resolve this issue I would have to visit some 20 hosts via PuTTy and restart the StorageRM service. This seemed as a pretty tedious thing to do one-by-one, so I took the scripting approach 🙂

The only magic of this script lies in piping the root’s password in the plaintext (never visible to the user, but I guess this is not the maximum-security-best-practice) to the su -c command, which is will query you for the root password and then do a single command after successful authentication. You will need the plink utility to be able to send the commands via SSH.

For this script to work you will need to have an AD authentication to your ESXi host as well as the root password. What it basically does is retrieving a list of ESXi hosts from a text file, turning on SSH and disabling Lockdown Mode, runs the plink utility and then running a one-liner command with root privileges found inside the $runssh variable. Don’t worry about the last few lines being blue (aka commented) starting from line 71 – the crazy quotation is there to enable the root command’s execution. I let my own command /etc/init.d/storageRM start there so you can see the whole syntax.

function ESXSvc ($command, $service, $inESX)
{
 #Function starts here
 # Check if the service is running...
 $running = Get-VMHostService -VMHost $inESX | Where { $_.Key -eq "$service" } | Select -ExpandProperty Running

 If ($command -eq "start")
 {
 If ($running -eq $false)
 {
 Write-Host "Starting $service Service on $inESX"
 Get-VMHostService -VMHost $inESX | Where { $_.Key -eq "$service" } | Start-VMHostService -Confirm:$false | Out-Null
 }
 ELSE
 {
 Write-Host "The $service Service is already running on $inESX"
 }
 }
 ElseIf ($command -eq "stop")
 {
 If ($running -eq $true)
 {
 Write-Host "Stopping $service Service on $inESX"
 Get-VMHostService -VMHost $inESX | Where { $_.Key -eq “$service” } | Stop-VMHostService -Confirm:$false | Out-Null
 }
 Else
 {
 Write-Host "The $service Service is already stopped on $inESX"
 }
 }
} # Function ends here

$sshsvc = 'TSM-SSH'

Write-Host "--- ESXi Root Commands Probe ---`nUse to run as a root on a single or many ESXi hosts remotely `n" -ForegroundColor Green

# set variables for SCP transfer
$termapp = '.\plink.exe'
$esxilist = Get-Content esxi.txt

# Define username to be used for pushing the file via SCP, the user must be able to access the ESXi host with these credentials
$scpuser = Read-Host 'Enter your superuser account credentials in domain\user format'
$scppwd = Read-Host 'Enter your superuser password' -AsSecureString
$rootpw = Read-Host 'Enter ther Root Password for ESXi' -AsSecureString

ForEach ($esxi in $esxilist)
{
 Write-Host `n

 # Convert SecureStrings to plain password
 $BSTR0 = [System.Runtime.InteropServices.Marshal]::SecureStringToBSTR($scppwd)
 $PlainPassword = [System.Runtime.InteropServices.Marshal]::PtrToStringAuto($BSTR0)
 $BSTR1 = [System.Runtime.InteropServices.Marshal]::SecureStringToBSTR($rootpw)
 $PlainRootPw = [System.Runtime.InteropServices.Marshal]::PtrToStringAuto($BSTR1)

 Write-Host "********** Initiating connection to" $esxi "**********"`n -ForegroundColor 'Yellow'

 # Start SSH and Exit Lockdown mode...
 ESXSvc "start" $sshsvc $esxi
 write-host "Exitting Lockdown Mode"
 (Get-VMhost $esxi | Get-View).ExitLockdownMode() | Out-Null

 Write-Host "Storing RSA key in the host cache..." $esxi -ForegroundColor Green
 # If the host's key has not been cached before, send a "yes" before performing a blank function inside the session.
 $runssh = "cmd /c echo y | $termapp -pw $PlainPassword $scpuser`@$esxi exit"
 Invoke-Expression $runssh | Out-Null

 Write-Host "Running the command! `n" -ForegroundColor green
 # Enter your command you want to run as root in $shellcmd
 $shellcmd = "/etc/init.d/storageRM start"
 $cmd = "echo $plainrootpw | su -c `'$shellcmd`' "
 $runssh = "$termapp -pw $PlainPassword $scpuser`@$esxi `"$cmd`""
 Invoke-Expression $runssh 

 #Reset the converted password string to NULL
 $PlainPassword = $null
 $PlainRootPw = $null

 # Stop SSH and Enter Lockdown mode...
 ESXSvc "stop" $sshsvc $esxi
 Write-Host "Entering Lockdown Mode"
 (get-vmhost $esxi | get-view).EnterLockdownMode() | Out-Null

 Write-Host "********** Disconnected from" $esxi "**********" `n -ForegroundColor 'Yellow'

}

I hope this helped some of you to tackle an issue that needs root privileges and needs to be run at several hosts.