I have needed to stress test a component inside a physical server – this time it was CPU and I’d like to share my method here. I have done a Memory Stress Test using a Windows VM in a previous article. I will be using a Windows VM again, but this time it will be Windows Server 2012 Standard Edition that can handle up to 4TB Memory and up to 64 Sockets containing 640 logical processors – a very nice bump from Windows Server 2008 R2 Standard that had a Compute configuration maximum of 4 sockets and 32 GB RAM.
The host has crashed several times into a PSOD with Uncorrectable Machine Check Errors. From the start I had a hunch that the second Physical CPU or a System Board are faulty – but these were replaced already and the host has crashed yet again. I have taken a closer look at the matter and went to stress thest this ill host’s CPUs.
Stress Test VM Configuration and Its Alignment With Physical Hardware
Inside the server, the CPU that needs to be tested is a Dual-Socket 12-Core Xeon and this is the only thing that will be of interest to us. Therefore this host is composed of two NUMA nodes, each containing 12 Physical Cores and in total 24 Logical Cores (including the HyperThreaded ones) – I have chosen a methodical approach – first spanning on both NUMA nodes and then testing separately on each node.
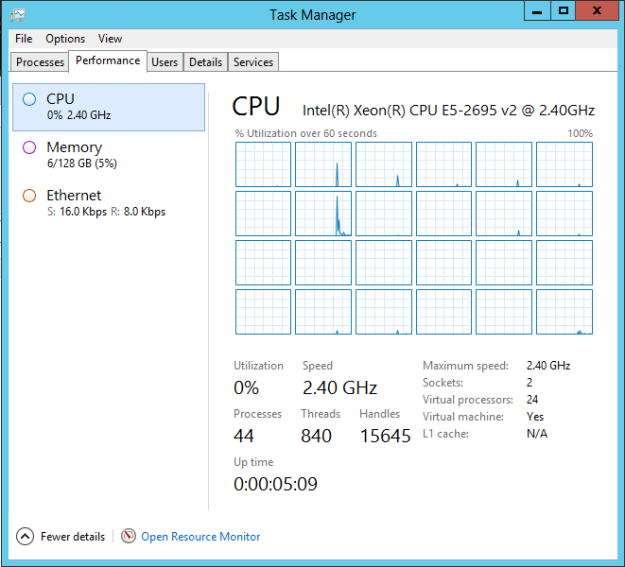
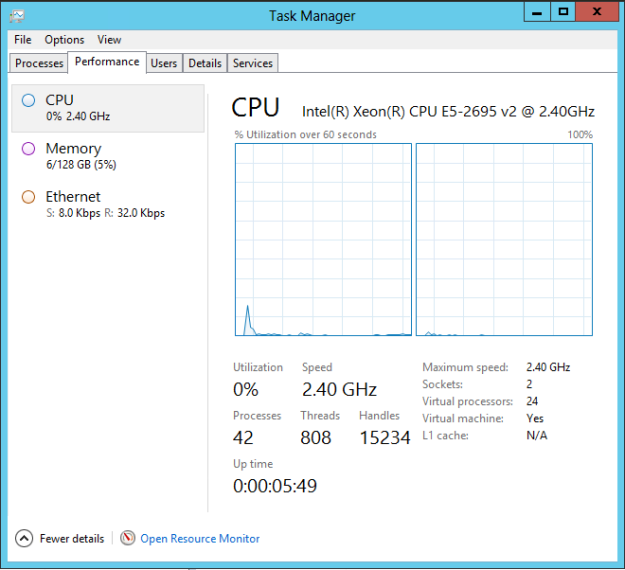
For the first test, I have spanned this VM across all 24 Physical Cores, supported with 128 GB RAM – that is much more than I would have needed – but hey, it’s a VM on a host that has been put aside for testing – so why not :). The VM was configured to be aligned with the host’s NUMA Architecture, so I have configured 2 Sockets with 12 Cores Each. This got passed down to the Guest OS where I could have chosen not only the classical CPU Cores overview but also NUMA Node overview – a very nice change that came with Windows Server 2012’s Task Manager.
Performing the Stress Test
It didn’t take long and I have loaded the IntelBurnTest utility inside the guest and started the stress test several times. The OS load then looked like this:
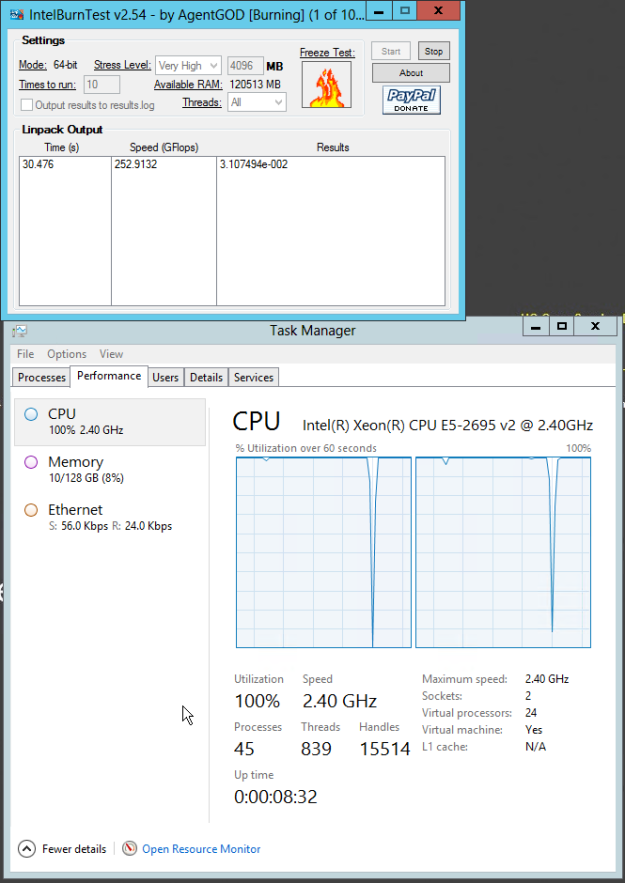
NUMA Node load while IntelBurnTest is running – the short drop is a “cooldown pause” between the iterations.
And after a while, the ESXi host has crashed – again with the same error as always:
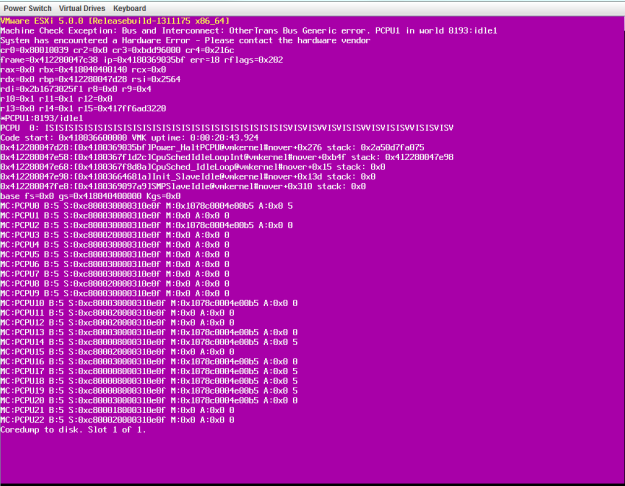
PSOD Pointing to a Machine Check Exception. Bus and Interconnect: Other Trans Bus Generic Error on PCPU1
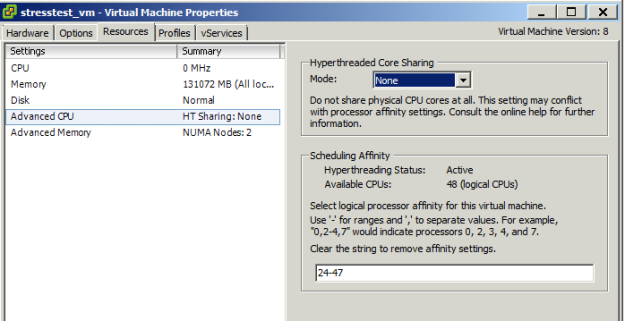
After confirming the hardware fault is still there, I have chosen the method of assigning the VM only to one set of logical CPUs using the VM Affinity rule. I have disabled the Hyperthreaded Core Sharing (1) to make sure that only the stress-test VM will be using the physical cores, and allocated Logical CPUs (2) 0-23, technically the 1st Physical CPU, to the VM.
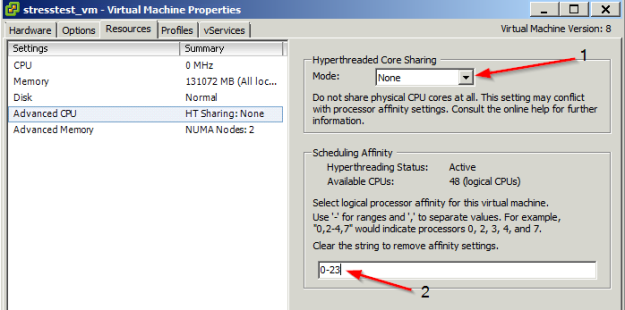
A setup for the Virtual Machine to run on the 1st Physical CPU without sharing any of the physical cores
The ESXi host was stable while running in the above configuration. I have done the same thing again for the second Physical CPU, this time choosing logical processors #24-47.
When stress-testing the ESXi host on the second CPU, it kept crashing. I have taken a look on the iLO and saw that at the same time, both processors have reported a MCE: It seems that the eventual solution will be to replace the 1st Physical CPU as well, as it seems there can be something wrong with the QPI Paths inside the processor.
Checking and debugging the Machine Check Errors Inside iLO Logs
Checking the iLO revealed the following condition on both physical CPUs (click to enlarge and see the difference):
at the same time, both processors reported an MCE.
- Processor 1: 0xB200000072000402 – this is the first time the error has been reported while stress testing with an affinity on the Second Physical CPU
- Processor 2: 0xFA001A4000020E0F – this has been reported when the whole NUMA node was tested
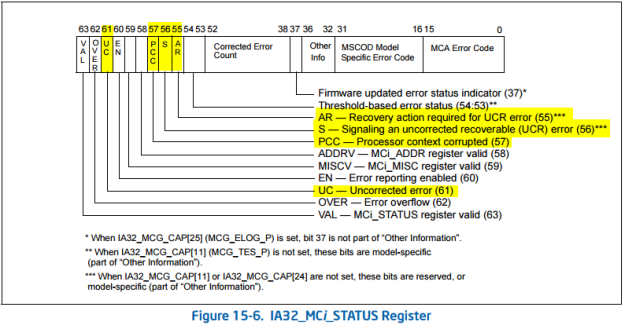
In my previous article about stress testing the host’s memory the Processor 2’s MCE was debugged there and was shown to be indeed a Generic TransBus Error. Now let’s take a quick look at Processor 1’s MCE. I will try to be more detailed than in my previous article. I’ll again be using the indispensable Intel® 64 and IA-32 Architectures Software Developer’s Manual (further referenced as “the Manual”) – the pictures below are courtesy of Intel Corporation and are taken from that manual.
Step 1: Convert the Hexadecimal String to Binary (I like mathisfun.com’s converter) and space it appropriately according to Figure 15-6 in the Manual. That way you can better see the bits we need (61 and 57-55) to further debug.
0xB200000072000402 hexadecimal = 1011001000000000000000000000000001110010000000000000010000000010 binary.
After splitting:
1 0 1 1 0 0 1 0 0 00 0000000000000000 0 0000 0111001000000000 0000 0100 0000 0010
Going from left to right, bit by bit, we gather the values according to the image above:
VAL – TRUE
OVER – FALSE
UC – TRUE
EN – TRUE
MISCV – FALSE
ADDRV – FALSE
PCC – TRUE
S – FALSE
AR – FALSE
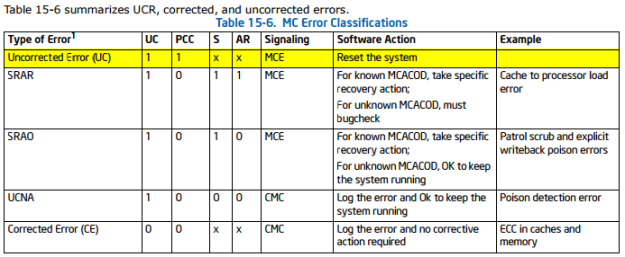
With the values we have retrieved below, let’s take a look at Table 15-6 inside the Manual to see what kind of error we might have run into.
Uncorrected Error, okay – the last thing we need to check is where that stemmed from. We now need the last 16 bits of the MCE to decode what exactly went wrong.
0402h = 0000 0100 0000 00102
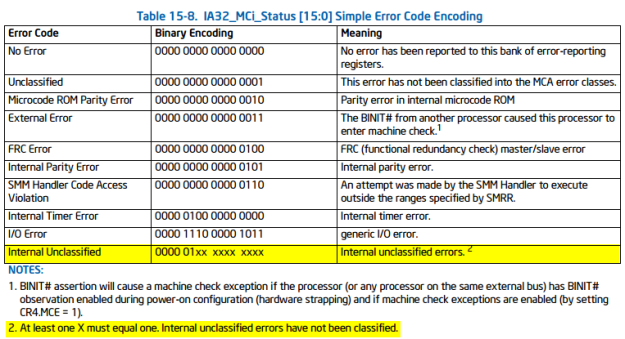
With this number, we’ll take a look in Table 15-8 in The Manual for Simple Error Code Encoding.
Now, we see that we have unfortunately run into an Internal unclassified error – looking at the note a condition must be satisfied that at least one X must equal to one, and that is true.
This means that the first processor plays a role in our ESXi host crashing as well, but it was pretty well hidden until a custom stress test was made – only the 2nd CPU has seemed to cause trouble when the stress test was spanning both NUMA nodes.
Why Stress Test the Hardware on an ESXi Hypervisor and a Few Tips
The question you might ask – why go through all this to stress test the physical hardware with a Virtual Machine running on top of a hypervisor? First, ESXi is tailored to be sensitive to any hardware anomalies and likes to tell you about it in its logs.
Second, when you have enough experience troubleshooting the insides of ESXi and understand how VMkernel, and the hardware it runs on top of ticks, you can more easily understand the logs (vmkernel.log and vmkwarning.log in this case) or PSODs.
Of course you can get the crash on a Linux or Windows OS Live CD, but debugging the crash dumps or kernel panics might introduce some additional overhead. But if you are more experience in decoding its crash dumps and just starting with ESXi – go ahead and do whatever you are more comfortable and proficient with 🙂
I’d like to close today’s post with a few guidelines that should be followed while putting the necessary stress on ESXi host’s components:
- Check up on your Server’s Out-of-Band Management Interface (iDRAC, iLO, etc.) for any failures inside the logs besides the hypervisor one’s. After you have been successful in crashing the ESXi host, you can gain an invaluable insight on what the OS couldn’t report to you because several errors could have been reported at once.
- Keep the VM’s configration aligned to the physical hardware itself – if you are testing CPUs, span your VM across the whole logical CPU (physical + hyperthreaded cores). If you are testing memory, try to span either the whole NUMA node, or make a few smaller, evenly configured VMs that will be running the stress test at once on the same Compute Component.
- The OS Flavor is a purely personal choice. I have tried and memory can be also tested by a VM with MemTest86 running, and there is also a Linux distro called StressLinux (even a network can be stress tested with this handy tool) that will do the job just as well.
- Know what you are stress testing, how you are stress testing and why you are stress testing. A knowledge of underlying hardware is invaluable for troubleshooting either with your Data Center Team or with your Vendor’s Hardware Engineers.
- Have a long enough maintenance window to do your stress test and move the host out of the tested cluster while doing the necessary tasks.
Thank you for taking your time to read the article. I hope you’ve gained some valuable knowledge that will come handy to you either today, or some time in the future.
Cheers, and see you soon!
Pingback: Stress Testing an ESXi Host with Windows Server VMs | VMXP
Pingback: Debugging Machine Check Errors (MCEs) | VMXP