Monthly Archives: October 2014

Book Review: Mastering VMware vSphere 5.5

Book Cover

Today I’ll be sharing a short review for the of the book, Mastering VMware vSphere 5.5 – Kindle Edition. I purchased it in order to enhance my knowledge, and in hope that it will help me be better prepared for the VCP510 exam. This book has  greatly fulfilled both of my expectations.

I read it from cover to cover, as I usually read all the technically oriented books in order to soak the most knowledge I can. The book is nicely written, with sidebars providing very useful knowledge from working experience. As can be expected from a book that contains “Mastering” in its name, it focuses on every single aspect of vSphere. Starting from the basics in each of its chapters, smoothly transferring to an in-depth level. There is a step-by-step walk-through for every action that is a subject of the chapter along with screenshots. Technically complex matters are displayed graphically to enhance your imagination, which is always nice.

The paperback version has 840 pages – this translates to roughly 15 hours of reading if you don’t just want to skim through the book or just look for enlightenment in certain chapters. But it is certainly good to read the book bit by bit – I guess reading it all in one sitting would result in an information overload 🙂

I wish I could sum up each element this book covers, but I’d be just typing out all vSphere features and aspects such as networking and storage and their underlying components – that many of you are already familiar with. If you have some vSphere experience – or you grasp the concept of virtualization with some IT background and seek a book that will get you started with vSphere, would like to know how certain things work “under the hood”, or just want to see how the authors tackled some real-world scenarios, this book is for you.

As for myself, I read this book with some ~5 months of last-level operator experience and learned many new things. For example did you know that during vMotion the memory snapshot of the source VM is sent to the destination ESXi host in clear text? Or that while using NFS connection to your datastores, only one of the two uplinks being used for the data transfer, even though LACP is used? And there’s much, much more. While sweating in the exam room answering the VCP questions, I recalled what I read in this book many times. Even though this book is revolving around vSphere 5.5 and its features, it is tremendeously helpful for use with earlier versions of vSphere 5.x.

I heartily recommend this book to everyone who wants to learn more about the vast amount features in vSphere. Be it people recently introduced to virtualization, or seasoned vSphere operators who would like to know more. It will even help you to prepare for VCP if you take your time and indulge in the chapters.

Stress Testing an ESXi Host with Windows Server VMs

When you need to stress test a certain component inside your ESXi to reproduce a system crash / Machine Check Error occurrence, it is possible to make your own Stress Test using a Windows Server 2008 R2 (or higher) machines. Let’s take a look on how you design and then run a stress test. In this article I’ll be focused on making a memory stress test scenario on one ESXi host.

UPDATE: I have published another CPU Stress Testing article including Machine Check Error debugging walkthrough using a Windows 2012 VM. Check it out 🙂

First, you need to determine how to split the VMs between physical NUMA nodes on the ESXi host if you want to stress a particular node – this was my case. Our model system that has undergone a stress test is a Dual 8-Core Xeon with 192 GB RAM. The Dual-processor architecture with a Xeon CPU means that there are 2 NUMA nodes, each with 96GB RAM. Therefore, I created two VMs running Windows Server 2008 R2 Enterprise to be able to map 1/2 of the NUMA node’s memory (48 GB) to each of them. Each VM had 4 vCPUs assigned to comply with 1/2 of the node’s core count (not counting hyperthreading). Also it is mandatory to disable the swap file – we only want to fill the memory, not produce any IO on the array.

I have used the TestLimit 64-bit edition, a tool developed by Microsoft’s SysInternals (they make really awesome tools!) – just scroll down the page and search for TestLimit. The next thing you will need is the PsExec utility to run the TestLimit as a SYSTEM account – that will allow the TestLimit to fill and touch the memory. Once you have these two utilities downloaded on the stress testing VM, a little PowerShell magic comes to play:

RunStressTest.ps1

# Loops indefinitely
while ($true) {
# Start TestLimit that fills up all available physical memory and touches it afterwards
psexec -sid .\testlimit64.exe –d
# Sleep so that the memory gets filled, this needs to be finetuned to each individual machine
# If touching different NUMA node than is closest to pCPU the –s value will need to increase
Start-Sleep -s 11
# After the memory is full, find the TestLimit process ID and kill it
$killPID = (Get-Process | where {$_.name -like "*testlimit*"}).Id
Stop-Process $killPID –Force
# Sleep so that the Windows Kernel cleans up the freed memory so that the TestLimit can start again
# The memory needs to be cleaned completely before another TestLimit can start successfully.
Start-Sleep -s 9
}

This will invoke the TestLimit via PsExec and tell it to fill and subsequently touch all available RAM. The timeout values were custom-tailored to kill the process after the memory had been filled, and a subsequent sleep command to allow for the RAM to be scrubbed by the Windows Kernel, Since our aim is to crash the ESXi host or invoke the Machine Check Errors, the script executes TestLimit ad infinitum.

A few finishing touches had to be applied in vCenter – assigning only memory from the 1st NUMA Node (logically the 0th), and binding the virtual CPUs to Physical CPU 1 – separated between 16 logical CPUs, cores 0-15. Therefore I applied logical CPUs 0-7 for the 1st VM and 8-15 for the 2nd VM. Also I have disabled any core sharing for the running VMs so that the VMkernel CPU Scheduler left them running where they started.

image001

image007

I have cloned this prepared VM and started the stress test on both VMs simultaneously.

image003

This is how the test ran on its own NUMA node:
numa-changedtoownnode

And this is how it looked after you have instructed the first CPU to touch the second CPU’s memory (you can do this in realtime). Notice the drop in memory filling rate for the first 5 runs and then the peak being lower than when accessing the processor’s own memory – here you can see the penalty to memory access across nodes.

numa-changed

The ESXi host then crashed within 10 minutes of running this stress test. It crashed even faster when the 2nd Physical CPU touched the 1st CPUs memory – and reporting MCE errors as well in both cases. This made me 90% sure that the faulty component was memory and eventually it turned out that I was right.

On the same machine you could have Stress Tested  the physical CPU as well, using a very handy IntelBurnTest Utility on each VM with affinity set.

If you’ve got any other custom stress tests devised, I’d be happy to hear in the comments below.

Scripting Corner: Command line arguments and Changing VM’s configuration parameters with PowerCLI

Sometimes it is useful to run a PowerShell script with commandline arguments in order to make the action faster – be it automation of the workflow or a number of batch jobs where foreach wouldn’t be usable.

The arguments you feed into your powershell scripts are stored in the global $args array, and we will operate with them as such.

Let’s assume we want to make a powershell script that will allow our 2nd level colleagues to be able to change the Virtual Machine’s Advanced Parameters without going to vCenter, having to shut down the VM, change values and then power it back on again – this would be done in a vCenter Orchestrator workflow that actually calls this script with parameters as inputs.

If you would do

.\test.ps1 a b c

The $args variable would be an array of @("a","b","c") – now you would like to pass these arguments further to your function either by putting them in its definition, or its code using the param(parameters). You can put a data type before the argument’s variable into brackets, such as string, int etc.

# Define the parameters while initializing the function and pass them to variables used inside
function main([string]$myparam = $args[0], [string]$yourparam = $args[1], [string]$anotherparam = $args[2]) {
Write-Host $myparam $yourparam $anotherparam
}

#Or you can do it like this, with param(parameters) inside the function itself:
function main2() {
#the param must be the very first line after the function definiton starts!
param([string]$myparam = $args[0], [string]$yourparam = $args[1], [string]$anotherparam = $args[2])
Write-Host $myparam $yourparam $anotherparam
}

Everytime you invoke either “main a b c” or “main2 a b c” you will have the output of “a b c” written in the console.

If this is a .ps1 file, you will just add the name of the function to the last line of your script. This will execute the function using the command-line arguments as its variables.

Pretty straightforward, right? You can find the whole script to change an advanced VM parameter below. No error checking with Try, Catch included yet (this will be a topic for next scripting corner), as this script expects an automated input.

# USAGE: .\script.ps1 vcenter virtualmachine advancedparametername advancedparametervalue
# EXAMPLE: .\script.ps1 myvcenter.org TESTVM01 disk.enableUUID false

# Define a function, get variables from the command line feed
function main([string]$vic = $args[0], [string]$vm = $args[1], [string]$parameter = $args[2], [string]$paramvalue = $args[3]) {

# Connect to vCenter
Write-Host "Connecting to vCenter" $vic
Connect-VIServer $vic | Out-Null

# Get VM...
Write-Host "Getting VM..." $vm
$target = Get-VM $vm

# ...and fetch its advanced settings...
Write-Host "Fetching advanced settings of the VM..."
$targetpara = $target | Get-AdvancedSetting | ? {$_.Name -like "$parameter"}

# Compare the new and current settings and proceed accordingly
If ($targetpara.value -ne $paramvalue) {
Write-Host "Applying newly configured settings..." `n "Name: " $parameter `n "Value: " $paramvalue

Set-AdvancedSetting -AdvancedSetting $targetpara -Value "$paramvalue" -Confirm:$false | Out-Null

Write-Host "Done!" -foregroundcolor Green
}
Else {
Write-Host "The target value has alredy been set!"
}

# Finally disconnect from the vCenter.
Disconnect-Viserver $vic | Out-Null
}

# initiate the function
main

See you around in the next Scripting Corner 😉

Debugging Machine Check Errors (MCEs)

There comes a time where a hardware failure on one of your ESXi hosts is imminent. You can recognize that when the host crashes while under a certain CPU or Memory intensive load – or even at random. Most of the times without throwing a Purple Screen of Death so you can at least have a notion about what went wrong. There is a VMware KB Article 1005184 concerning this issue, and it has been updated significantly since I have started to take interest in these errors.

UPDATE: I have published a new CPU Stress Test & Machine Check Error debugging article – check it out if you’d like to learn more.

If you are “lucky”, you can see and decode yourself what preceded the crash. This is because both AMD and Intel CPUs have implemented something by the name of Memory Check Architecture. This architecture enables the CPUs to intelligently determine a fault that happens anywhere on the data transfer path during processor operation. This can capture Memory operation errors, CPU Bus interconnect errors, cache errors, and much more. How to determine what has been causing your system to fail? Read on.

You will need to browse to Intel’s website hosting the Intel® 64 and IA-32 Architectures Software Developer Manuals. There, download a manual named “Intel 64 and IA-32 Architectures Software Developer’s Manual Combined Volumes 3A, 3B, and 3C: System Programming Guide”. I highly recommend printing it, because you will be doing some back-and-forth seeking.

Now, to get list of possible Machine Check Errors captured by the VMkernel, run the following in your SSH session with superuser privileges:

cd /var/log;grep MCE vmkernel.log

this will output something similar to this:

Memory Controller Errors


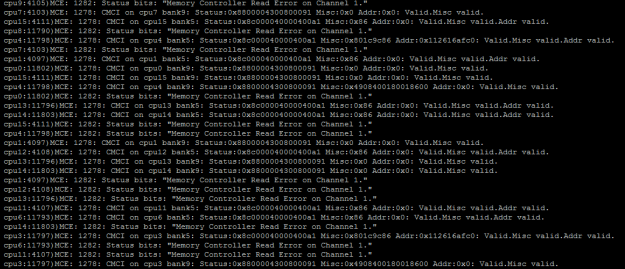
Most of the times, the VMkernel decodes these messages for you – on this image you see that  there are plenty of Memory Controller Read Errors. You can see more closely where the problem originates from:

  • CMCI: This stands for Corrected Machine Check Interrupt – an error was captured but it was corrected and the VMkernel can keep on running. If this were to be an uncorrectalbe error, the ESXi host would crash.
  • Logical CPU number where the MCE was detected: This particular host had Dual 8-Core Intel Xeon Processors with HyperThreading enabled. For all other occurrences of this MCE, the cpu# was alternating between 0-15 this means the fault was always detected on the first cpu.
  • Memory Controller Read/Write/Scrubbing error on Channel x: Means that the error was captured on a certain channel of the physical processor’s NUMA node. Since there is a quad-channel memory controller used for this particular CPU, the channels would range from 0-3. This error is reported on Channel 1, which means one or both of the memory sticks on that channel are faulty.

You can turn on your hardware vendor’s support indicating that a component might be failing, or nudge them towards a certain component – but always make sure there is a support representative from VMware to back your findings up. Some companies don’t “trust” these error messages and if their diagnostics software doesn’t reveal the fault (in majority of cases, they don’t) and their engineers do not know about Memory Check Architecture – how it is implemented and whether to trust the error codes (they should). This is where a leverage from your VMware support engineer comes in very handy – speaking from my experience. In the end the memory stick replacement solved the issue – how I got to it being a memory problem will be explained in an upcoming article.

If you are curious what do these hexadecimal strings mean and would like to know how to decode them manually, here’s a short walk-through (This was captured on the same host, when it had scrubbing errors)

  • You have to convert the Status string from Hexadecimal to Binary

Status:0xcc001c83000800c1 Misc:0x9084003c003c68c Addr:0x112616bc40  — Valid.Overflow.Misc valid.Addr valid.

  • Convert the Status hex value to Binary and split it according to Figure 15-6 in the manual

1 1 0 0 1 1 0 0 0 00 0000000011100000 0 0011 0000000000001000 0000 0000 1100 0001

  •  Note down the last bits:

VAL — MCi_STATUS register valid (63) = TRUE
OVER — Error overflow (62) – TRUE , corresponds with Valid.Overflow.Misc valid.Addr valid
UC — Uncorrected error (61) – FALSE
EN — Error reporting enabled (60) – FALSE
PCC – FALSE
0000000011100000 how many errors were corrected = 224 errors

  • Note the first 16 bits

MSCOD: 0000 0000 1100 0001

  •  Compare the code bits according to table 15-6

UC = FALSE and PCC FALSE, therefore: ECC in caches and memory

  •  Decode the compound Code and compare it to the examples found in table 15.9.2

Therefore, the compound error code is “Memory Controller Errors”

MMM = 100
CCCC = 0001
{100}_channel{0001}_ERR

  •  From there, decode this according to table 15-13:

Memory Controller Scrubbing Error on Channel 1

Pretty easy, right? Let me give you another MCE example – This was captured from an ESXi host that eventually had 2 faulty memory modules, but was only acknowledged by the manufacturer when they had exceeded the Corrected ECC threshold. BIOS marked them as inactive after running memtest 86+ on them for 20 hours since that error was detected – the integrated diagnostics utility revealed nothing. I’ll provide a quicker debug here:

 1 1 0 0 1 1 0 0 0 00 0000000000001110 0 0000 0000000000000001 0000 0000 1001 1111

  •  VAL – MCi_STATUS register Valid – TRUE
  • OVER – Error overflow – TRUE
  • UC – Uncorrected Error FALSE
  • EN – Error reporting enabled FALSE
  • MISCV TRUE
  • ADDRV TRUE
  • PCC FALSE
  • S FALSE
  • THRESHOLD – FALSE

MCE CODE: 0000 0000 1001 1111

This code relates to error in: ECC in caches and memory

After debug:
{001}_channel{1111}_ERR
Memory Read Error on an Unspecified Channel

I hope this article has shed some light for you concerning the Machine Check Error architecture. I’m open for discussion about this topic and even some MCEs you had in the comments.

Blog is alive!

Hello there,

I have finally convinced myself to start a blog where I’ll be sharing tips, tricks and insights from my working experience – so far I plan to make a new post every Monday, Wednesday and Friday – that is until I run out of pre-prepared materials that should last for another week or two 🙂

Have a great morning/day/evening wherever you are. Looking forward to spreading the knowledge!