When you need to stress test a certain component inside your ESXi to reproduce a system crash / Machine Check Error occurrence, it is possible to make your own Stress Test using a Windows Server 2008 R2 (or higher) machines. Let’s take a look on how you design and then run a stress test. In this article I’ll be focused on making a memory stress test scenario on one ESXi host.
UPDATE: I have published another CPU Stress Testing article including Machine Check Error debugging walkthrough using a Windows 2012 VM. Check it out 🙂
First, you need to determine how to split the VMs between physical NUMA nodes on the ESXi host if you want to stress a particular node – this was my case. Our model system that has undergone a stress test is a Dual 8-Core Xeon with 192 GB RAM. The Dual-processor architecture with a Xeon CPU means that there are 2 NUMA nodes, each with 96GB RAM. Therefore, I created two VMs running Windows Server 2008 R2 Enterprise to be able to map 1/2 of the NUMA node’s memory (48 GB) to each of them. Each VM had 4 vCPUs assigned to comply with 1/2 of the node’s core count (not counting hyperthreading). Also it is mandatory to disable the swap file – we only want to fill the memory, not produce any IO on the array.
I have used the TestLimit 64-bit edition, a tool developed by Microsoft’s SysInternals (they make really awesome tools!) – just scroll down the page and search for TestLimit. The next thing you will need is the PsExec utility to run the TestLimit as a SYSTEM account – that will allow the TestLimit to fill and touch the memory. Once you have these two utilities downloaded on the stress testing VM, a little PowerShell magic comes to play:
RunStressTest.ps1
# Loops indefinitely
while ($true) {
# Start TestLimit that fills up all available physical memory and touches it afterwards
psexec -sid .\testlimit64.exe –d
# Sleep so that the memory gets filled, this needs to be finetuned to each individual machine
# If touching different NUMA node than is closest to pCPU the –s value will need to increase
Start-Sleep -s 11
# After the memory is full, find the TestLimit process ID and kill it
$killPID = (Get-Process | where {$_.name -like "*testlimit*"}).Id
Stop-Process $killPID –Force
# Sleep so that the Windows Kernel cleans up the freed memory so that the TestLimit can start again
# The memory needs to be cleaned completely before another TestLimit can start successfully.
Start-Sleep -s 9
}
This will invoke the TestLimit via PsExec and tell it to fill and subsequently touch all available RAM. The timeout values were custom-tailored to kill the process after the memory had been filled, and a subsequent sleep command to allow for the RAM to be scrubbed by the Windows Kernel, Since our aim is to crash the ESXi host or invoke the Machine Check Errors, the script executes TestLimit ad infinitum.
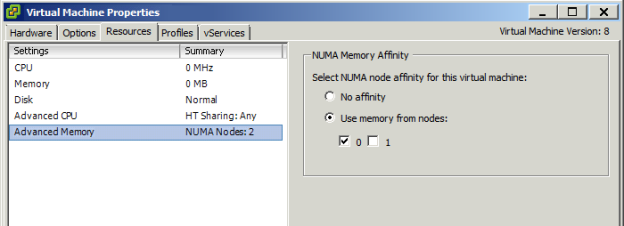
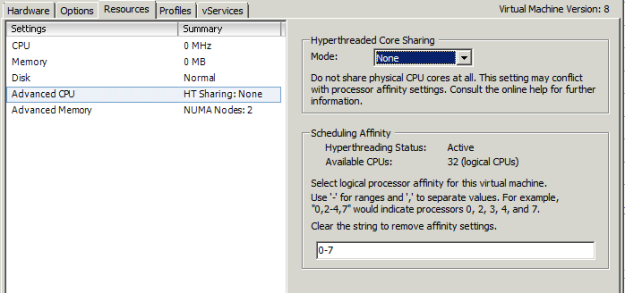
A few finishing touches had to be applied in vCenter – assigning only memory from the 1st NUMA Node (logically the 0th), and binding the virtual CPUs to Physical CPU 1 – separated between 16 logical CPUs, cores 0-15. Therefore I applied logical CPUs 0-7 for the 1st VM and 8-15 for the 2nd VM. Also I have disabled any core sharing for the running VMs so that the VMkernel CPU Scheduler left them running where they started.
I have cloned this prepared VM and started the stress test on both VMs simultaneously.
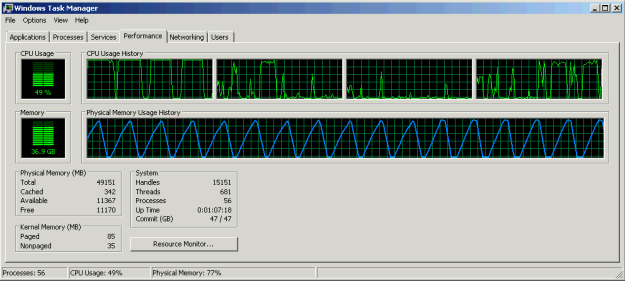
This is how the test ran on its own NUMA node:

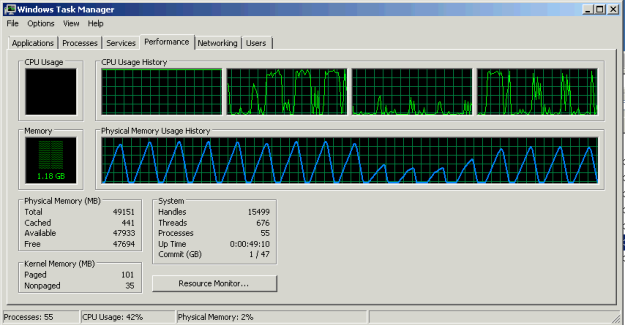
And this is how it looked after you have instructed the first CPU to touch the second CPU’s memory (you can do this in realtime). Notice the drop in memory filling rate for the first 5 runs and then the peak being lower than when accessing the processor’s own memory – here you can see the penalty to memory access across nodes.
The ESXi host then crashed within 10 minutes of running this stress test. It crashed even faster when the 2nd Physical CPU touched the 1st CPUs memory – and reporting MCE errors as well in both cases. This made me 90% sure that the faulty component was memory and eventually it turned out that I was right.
On the same machine you could have Stress Tested the physical CPU as well, using a very handy IntelBurnTest Utility on each VM with affinity set.
If you’ve got any other custom stress tests devised, I’d be happy to hear in the comments below.


Pingback: PSOD Caused by a Machine Check Exception | VMXP
Sir ur leaking memory and letting windows to reclaim it. Will the VM crash? and can u put more details on how would you expect the esxi to crash?
The purpose of this test was to let the ESXi host that was suspected to have faulty memory crash. You can see in this article: https://vmxp.wordpress.com/2014/10/27/debugging-machine-check-errors-mces/ what had initiated this stress test procedure.
The ESXi crashed because too many corrupt memory pages were either retired or had invalid data inside them.
The VM does not crash unless the Guest OS gives it any reason to crash – and since modern OSes are pretty resilient to memory stress tests (unless a hardware/driver is faulty) I’d doubt you can crash a VM simply with this stress test.
Is there any technical issue you are facing in your environment??
I want to measure the MTTF of ESXi server having 2 VMs for some stress test on VMs. I used Intel IBT and later the trick mentioned here. I couldnt succeed. Do you have any idea to suit my purpose?
Hello,
measuring MTTF of an ESXi host would be a matter of several years in my opinion. First and foremost are the drivers/firmware that are recommended as per hardware vendor’s recipe to ensure maximum stability of your systems.
All hardware undergoes a certain subset of stress tests before being released “to the shelves”. You can save yourself a lot of work by choosing a reliable hardware vendor who will resolve any of your hardware issues promptly should a problem arise.
Pingback: Stress Testing an ESXi Host – CPU and MCE Debugging | VMXP