A few words to start with
Welcome to PowerCLI Sessions, where I’ll be showing you how VMware’s PowerShell Module PowerCLI works, along with examples so you can analyze, study, and most conveniently use the knowledge you find to your own good. I’d like to start with a “0th” session, to introduce people to PowerShell-based scripting on Windows Server systems.
Starting with Windows Server 2008, Microsoft has included an object-oriented shell to its systems called PowerShell. This was to quickly replace the previous, widely used scripting engine own to the Windows OS Family, Visual Basic. Whereas I have done several Visual Basic scripts in the past, it was frankly cumbersome to work with (and I guess many of you guys who have had the pleasure of scripting in VB will agree) – debugging was quite hard, the mnemonics were not that easy to remember – in short it did its job but you had to spend some time fiddling with the code as IDEs were next to none for this scripting language.
Introducing PowerShell & PowerCLI Module
With PowerShell, your weapons in the arsenal are the so-called commandlets (or cmdlets for short), and they are almost always based on a verb-noun basis, so they are pretty easy to remember. The outputs are almost always objects with various properties (or members) that are incredibly useful as I will be showing you throughout the lessons. You will need to wrap your mind around the fact that you are now working with objects in a shell environment – no more feeding plain strings everywhere. Sometimes you will need to input an object into your command else it will fail.
How does PowerCLI come into play here then? Simply by being a Module (we can also call it a plugin, extension, etc.) for PowerShell – supplying it with many new commandlets to be used exclusively within a VMware environment – all these commandlets operate by communicating with vCenter Server, or the ESXi host itself.
Installation
First things first – make sure your core PowerShell is updated to the most recent version possible (v3 for Windows 2008 R2 and v4 for Windows Server 2012 onwards) You can get the PowerCLI Version 5.5 in VMware’s repository – you will just need an account at my.vmware.com. The installation is pretty simple. Just download the executable, follow the instructions and then launch the console with a shortcut that has been created either in your start menu or on the Desktop.
Getting warmed up
The simplest command you will use in PowerCLI is Connect-VIServer (notice the Verb-Noun mnemonic?). This will establish either a connection to the vCenter or ESXi host. If you are unsure how to use the command, just try to Get-Help for it.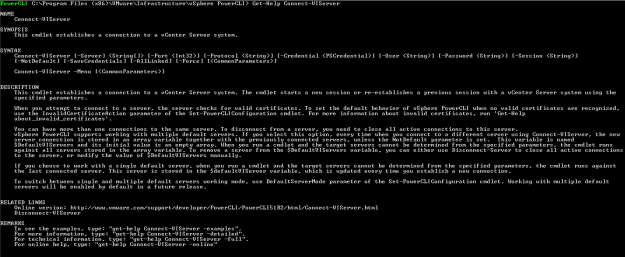
Now you are ready to run the command.

From there you can use Get-VMHost to list all your ESXi hosts connected to the vCenter Server, Get-VM to get all the Virtual Machines.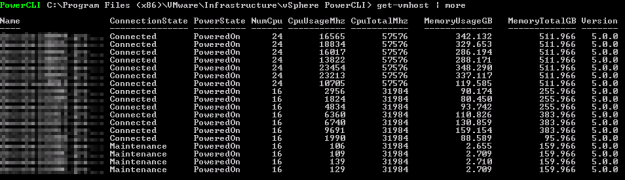
To explore each object’s properties, a VERY useful tool is Get-Member – this will show you what else is hiding behind the values that were just listed. Let’s try it with Get-VMHost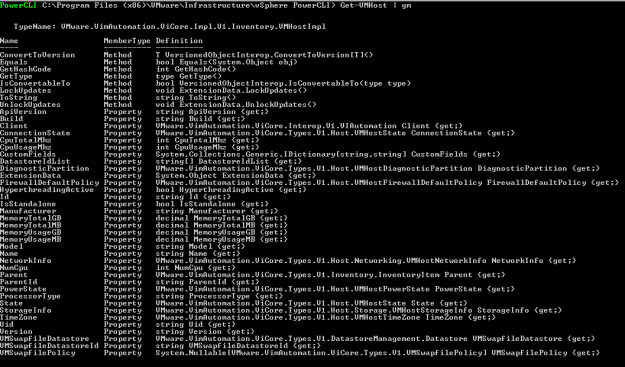
As you have noticed I have used the pipe and a shortcut to this command which is gm – and you will be using a lot while learning about objects’ members. To explore a member of the first position in the array, you use a dot like this – let’s use it to check the build number of the first ESXi host:

To disconnect from the vCenter Server or the ESXi host, just type in Disconnect-VIServer servername and you are done.
Congratulations! You have just tapped in the awesome world of PowerCLI – we’ll continue with introduction to variables in the next Session.